No Results Found
The page you requested could not be found. Try refining your search, or use the navigation above to locate the post.


Many children love horses. They are very graceful yet powerful. If you love horses too, we have a great offer for you: draw your own horse! With our guide, you will surely succeed, even though horses are among the more difficult animals to draw. This is mainly due to their four long legs. Therefore, try to follow the drawing instructions exactly and estimate the positions of the individual shapes accurately. And if it doesn’t work out at first: brush it off. Even drawing professionals encounter this. Just try again. But now – grab your drawing pencils and find a cozy spot to draw.
Then you can redraw your horse cleanly with a black fineliner. Then you can decide whether you want to color the horse. You can use brown earth tones like us or create a colorful fantasy horse. If you paint the mane in rainbow colors and then draw a horn on the head, you’ll get a pretty unicorn.


Spring is almost here now. Colorful flowers are sprouting everywhere from the ground. Or they’re growing on bushes and trees. Meanwhile, the sun is shining down on us under a blue sky. To preserve a bit of this beauty for home, it’s a great idea to draw it. So, let’s start with drawing tulips! Because they are currently enchanting many gardens and parks with their colorful splendor.
Unlike many animal tutorials, you’re often much freer with flowers and plants. Because they always grow a bit differently and come in various varieties. That’s why this drawing tutorial includes three different tulips to trace. You’ll see, it’s not so difficult at all!
So, if you want to draw tulips, you can start directly with the leaves. For this, simply draw a large V on your sheet of paper. The lines can be slightly curved. From the center of the V, in the second step, the tulip stem emerges. Draw two parallel lines upward, straight or slightly curved. In the third step, finish drawing the leaves.
Do you see that steps 4 to 5 occur multiple times? That’s because here we can draw different tulips. You can choose a flower head or draw several stems for multiple flowers.
Of course, you are also completely free in the color choice of your tulip splendor! There is probably hardly a color that doesn’t exist in tulips. Two-colored flowers are also common. Red-yellow? Purple-white? Orange-pink? Just give it a try and draw a whole colorful tulip meadow.


You probably know the story of the adorable clownfish Nemo, right? The little fish is captured from the sea by humans. His father then does everything in his power to free his son. Thanks to this funny animated film, clownfish became well-known and popular worldwide. Nowadays, you can find them in almost every larger aquarium.
The movie was created using computer-generated 3D animation. Today, we’ll show you how to draw a clownfish like Nemo yourself in 2D, on your paper.
To draw this marine creature yourself, start with a droplet shape. It’s sharp on the left and round on the right, like a lying raindrop. Then, in the second step, our clownfish gets an eye. And the tail fin can’t be missing! Additionally, we start drawing the pattern. At first, it’s just two lines in the middle of the fish. The one on the right is slightly curved.
As you follow the instructions below, more fins and patterns are added. If you’re not familiar with our drawing tutorials yet, feel free to check out this guide first. In the fifth step, the little clownfish gets its distinctive fin color. These are almost black on the outer edges. Only a thin white line is visible between this pattern and the tip of the fins.
With many fish, you can experiment with different colors. However, the clownfish is truly recognizable only by its orange-and-white coloration. So, try to color little Nemo as we show you in our guide. Everywhere the black areas of the fins meet, the fish is orange. And the rest of the body remains white. Not so difficult, right?
It’s nice if you don’t just draw one clownfish, but several at once! Maybe you want to draw an aquarium full of fish? Or an entire underwater landscape?


Do you want to learn how to draw a parrot? Then you’ve come to the right place! This beautiful drawing project may look impressive, but it’s actually quite manageable even for beginners. And thanks to its colorful plumage, coloring the parrot can be a lot of fun too.
As mentioned earlier, the colorful bird is suitable even for beginners, despite its seemingly complex appearance. This is because precision in shapes isn’t as crucial as it is, for example, with quadrupeds.
Before you begin, an important note: The macaw is a very tall subject. Therefore, make sure to leave enough space downwards while drawing. Nothing is more frustrating than realizing at the end that the bird unfortunately doesn’t fit entirely onto the paper!
If you look closely at the drawing guide, you’ll surely notice that the parrot consists of many droplet shapes: the body, tail feathers, wings, and beak all resemble droplets of various sizes – sometimes a bit rounder, sometimes a bit shorter or longer. The face, on the other hand, looks like a heart. These are good mnemonic devices that you can remember so that eventually, you can draw the parrot without a guide.
As always with drawing: Practice makes perfect. We recommend practicing as often as possible. It’s worth it! Drawing is a great, relaxing activity that promotes concentration and creativity. And it’s hugely motivating when you notice over time that you’re improving. So, grab your drawing tools! Why not try it out right away and leave us a comment on how it went with the macaw? We’d be especially delighted to receive pictures of your artwork.


Today, we want to look at how to draw a cow. Drawing a cow is usually not quite easy. Many struggle with proportions and drawing the four legs well. However, if you look closely at a cow, you’ll notice that it also consists of simple basic shapes: circles, rectangles, and lines. As always with drawing: you just need to know how! By the way, it’s worth trying to draw more challenging animals as well. Over time, you’ll become more confident in estimating distances and sizes correctly. But of course, it’s also okay if you want to start with something simpler first. For example, learning to draw a crab, a sheep, or a cute unicorn.
When drawing the cow, pay special attention to the correct distances. The legs are particularly tricky. So, don’t just quickly draw the small circles anywhere. Look closely: how close are the circles to the body? Are they all the same height? When you connect the circles with lines, you’ll surely notice that cow legs have a direction. The front legs are almost straight. However, the hind legs seem to be bent to the right. This may seem strange to you while drawing, but it makes your cow even more realistic. If you observe closely here, you’ll learn to draw well over time. Drawing and painting are closely related to observation. When you’re finished, outline your drawing neatly with a black pen. Then you can draw the cowhide pattern. This is fun, and you can confidently dare to come up with your own pattern.


Whether as a cuddly toy, keychain, or phone case – they always look great. Unicorns come in all sorts of colors and styles. But the main thing is that they’re cheerful, enchanting, and colorful! These fantastic creatures are therefore rightly popular for good reason. If you want to start your own creative unicorn project, we’ve gathered some inspiration for you on Pinterest. There, you’ll find many ideas for crafting, drawing, and coloring. But of course, here you’ll also find another drawing guide from “Learn to Draw”. Let’s get started!
This cute unicorn is not difficult to draw at all. You start with two oval circles. One is for the head, the other will be the body. Then add the horn, as well as two circles that will become the feet. Next, draw an ear, two legs, and an “S” for the tail. In step 4, add a wild mane, where you can let your creativity run wild. With the eye, nose, and hind legs, it already looks like a unicorn. Complete your drawing in the next steps and finally outline everything neatly with a black fineliner. Your unicorn drawing is now ready to be colored and embellished.
Since the unicorn is a fantasy creature, there are no right or wrong colors. Many like pink, purple, white, and rainbow colors, but really, anything goes. It definitely looks very pretty to emphasize the mane and tail with individual strokes. They will then look even more like hair. Also, take a look here, where we’ve shown how to color a picture with markers. It also looks cute if you paint the unicorn’s cheeks pink and highlight the nose with a slightly lighter or darker color. We colored it light purple.


Border Collie, German Shepherd, Dachshund, Pug… There are many hundreds of dog breeds. And how different they all look! Hard to imagine that they all have the same ancestors. Today we’ll show you how to draw a Border Collie. These dogs are especially playful and curious. They are also very smart! If you have a Border Collie as a pet, you should spend a lot of time with them. Then you can teach them some great tricks. Because this cute dog learns quickly!
The journey to your own Border Collie drawing isn’t so far. Simply follow our step-by-step drawing guide.
First, all you need to do is draw a circle. And then below it, draw a larger oval, roughly twice as tall as the upper circle. In the next step, the dog even gets its eyes and its snout. The snout looks a bit like a three lying on its back, don’t you think? Additionally, draw a curve on the bottom end of the long oval, on both the left and right sides. Below the oval, add two small circles. These will later become the front paws of the Border Collie.
Look closely at each image in the drawing guide to see which lines are added. You can identify the new lines by their pink color. Still unsure about the process? Refer to our guide.
For the Border Collie, the fluffy fur is particularly characteristic. So, at the end, you can make all the lines a bit jagged when tracing your pencil drawing with a fine liner. But be careful! Eyes, nose, and snout should remain smooth lines. Otherwise, your dog might look strange.
Additionally, what clearly distinguishes the Border Collie is its black-and-white coloring. The animal typically has a white belly and a white snout. An important detail is the white stripe that goes from the snout up over the forehead. The front legs and hind paws are also white. You can color the rest of the dog black or dark brown.


Today we invite you to explore the wonderful world of creativity, with a special focus: the snail. At first glance, a snail may seem unremarkable, but in its slow, persistent manner, it hides a fascinating beauty.
Snails are truly impressive little creatures, and there are so many fascinating reasons why they deserve attention! Firstly, they constantly carry their own small magical houses on their backs, which we call snail shells. It’s like a cozy home they can take with them wherever they go. Imagine being able to carry your bedroom on your back all the time!
What truly makes snails unique is their ability to create small works of art as they move. If you look closely, they leave behind beautiful patterns and trails on their path. It’s as if they’re embellishing the world with colors and shapes as they travel. Snails are like little artists leaving their art everywhere they go!
And did you know that snails are real superheroes? They have amazing abilities! For example, they can extend their eyes on stalks to discover everything around them. This makes them little curious detectives who don’t overlook any details. Snails teach us to explore the world around us with open eyes and a dose of curiosity.
So, the next time you see a snail, remember how special and impressive these little beings are.
Now take the drawing guide in hand, let your pen glide over the paper, and watch as your snail comes to life. Trust your own vision and enjoy the process of creation. We’ll give you a few tips on how to succeed:
Snails have no bones. This means that the slimy part of their body can move very flexibly. So, feel free to twist their shape in any direction! Just make sure that the snail shell sits roughly in the middle of the back and that the opening of the snail shell faces the body. In our example, the snail shell is slightly visible from the front. If it’s easier for you, you can also draw a spiral that opens towards the snail’s body. There are snails in all sorts of colors! Both the body and the shell can have various colors and patterns. So, go ahead and experiment, experiment, experiment! The snail’s eyes actually sit right at the top of its long feelers. This allows them to look in many directions, and the sensitive little eyes can quickly retract in danger. Want to make your snail drawing a bit cuter? Then draw it with big, adorable eyes! You’ll see that drawing a snail isn’t actually all that difficult. But as always, don’t be frustrated if it doesn’t work out right away. Practice makes perfect – and it’s also a lot of fun, we think.


A beautiful drawing can stand on its own. However, sometimes adding color just makes it even more beautiful. With color, you can give your drawing a very personal touch. Moreover, many animals and plants have very striking colors they are known for. Just think of the throat of a robin or the beautiful yellow flowers of a dandelion. You can color your picture with a variety of colors. There’s no right or wrong way to do it. Some people prefer markers, others colored pencils or watercolors. However, today we’ll be coloring our rabbit with markers. You should have already drawn the lines for this. (You can find the instructions for drawing the rabbit here.)
When coloring with markers, we work from light to dark. That means you start with the light colors. So, take a look at the instructions and pick out the lightest colors. For the rabbit, this is a very light gray. You can also use a light brown or a light yellow if you don’t have a gray marker.

Another light color is the pink of the ears and nose.

Now, the main color comes into play: use a beautiful brown to color the rabbit. Make sure to color neatly and not to paint over the light gray areas.

With a dark brown, you can now draw shadows. Draw small strokes in the direction of the fur to make the rabbit look nice and fluffy. Think about the direction of the light. If ot comes from the upper left side for example, the right lower parts would appear darker.

The rabbit is now finished, but if you like, you can add some grass now. Perhaps you have other ideas as well. How about drawing a tasty carrot for your rabbit? Or you could add a few Easter eggs, and you’ll have a card to give away at Easter.

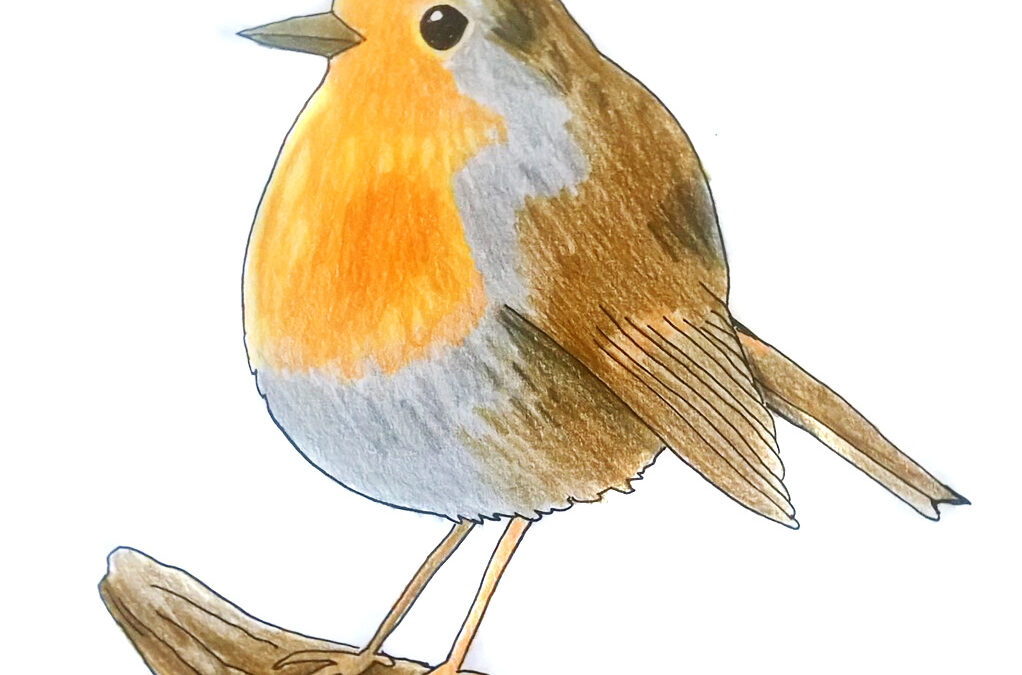
We have already looked at how to use our drawing instructions as well as how to color a picture with markers. But today, there shall be a guide for all colored pencil fans. So, grab your colored pencils and let’s get started! For our motif, we have chosen the robin. With its vibrant orange breast, it’s a beautiful subject to learn how to color with different hues. But of course, you can also pick up another one of our tutorials and color it. We like to use Polychromos by Faber-Castell. In art supply stores, you can find these pencils in all sorts of colors. But don’t worry if you use different colored pencils! The results can be just as lovely.
The page you requested could not be found. Try refining your search, or use the navigation above to locate the post.
Start by drawing according to the instructions. If you’re still having difficulty here, take a look at “How to use our drawing instructions“.

When coloring with colored pencils, it’s best to work from light to dark. So, start with the lightest colors first. Also, make sure that in this step, you only apply slight pressure. It’s enough to indicate which area should have which color. Therefore, color the neck and legs in light orange. Then, proceed to the bird’s midsection in gray, and finally, the rest in a light brown.


Now it gets exciting: Use the same colored pencils – but this time, you’re allowed to really apply color to the paper. So, press a bit harder and layer multiple coats. But be careful! In some areas, you can leave the light color as it is. For example, it looks very nice if you leave the light orange around the robin’s eye. In other areas, however, you can press down firmly: for example, under the wing, where there is a dark shadow. You can make the left (rear) leg darker with a darker brown. It’s in shadow, so it looks like that.


Now, here’s a little tip: Take a light-colored pencil and go over the orange breast once more. The overlapping layers of color will make the color really vibrant. Additionally, you can use a dark or black colored pencil to emphasize the darkest areas. If you wish, you can also place the robin on a branch as described in the instructions.


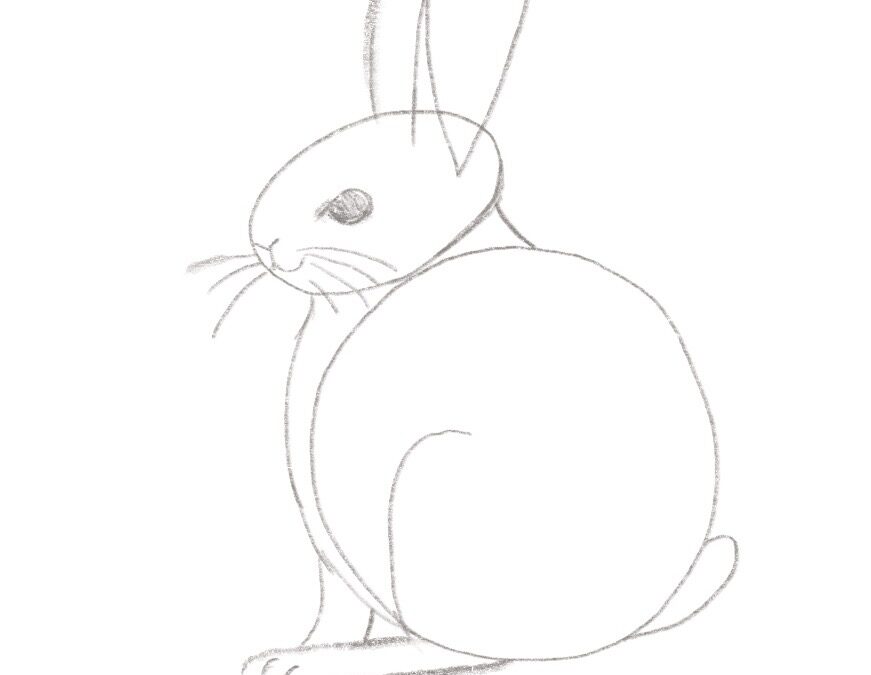
A beautiful drawing is already halfway there. That’s why today we want to show you how to create the perfect drawing very easily. You only need a pencil, an eraser, and a black fineliner or thin marker. Today, we’ll be drawing this rabbit:

You’re best off starting with the pencil. Especially at the beginning, it’s not so easy to allocate the space correctly. It’s great to be able to erase! In the first step, we start with a simple circle. But first, take a look at the instructions. You’ll notice that you need some space above and to the left of the circle. After all, a rabbit naturally has long ears and needs a head.

Now, add another smaller round shape for the head. It’s not really round, but rather a bit flat.

Be sure to maintain the distances and lengths of the lines accurately while drawing.

We’re adding more details to the drawing. Now it’s starting to look like a cute rabbit, isn’t it?

We’re finalizing the pencil drawing of our rabbit with the last details. Are all the lines and shapes from the drawing guide on our paper? Don’t forget the cute whiskers!

Now it’s time for the black fineliner. Trace over your pencil drawing neatly. Also, take a look at the last step in the instructions, as often there are additional details to add. Soft fur, paws, or whiskers will make your drawing really lovely.

Now you’re almost done! Let your drawing dry for a moment. Sometimes, you might smudge it a bit otherwise. Then, erase all the pencil lines. Doesn’t the rabbit look great?

The page you requested could not be found. Try refining your search, or use the navigation above to locate the post.
You need to load content from reCAPTCHA to submit the form. Please note that doing so will share data with third-party providers.
More Information