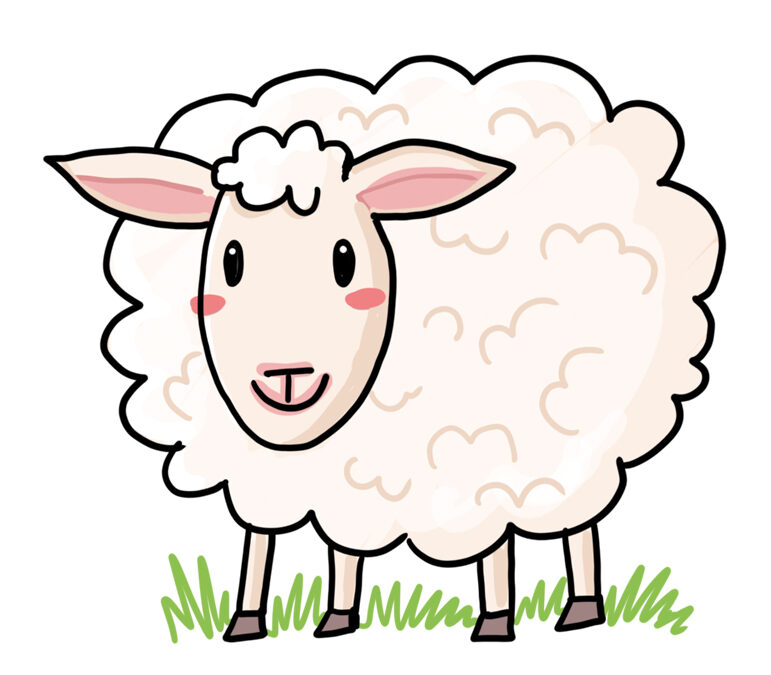
How to Draw a Kid (Baby Goat) – Easy Step-by-Step Drawing Tutorial for Beginners

How to Draw a Kid (Baby Goat) – Easy Step-by-Step Drawing Tutorial for Beginners

Learning how to draw a kid (baby goat) is a fun and beginner-friendly project for young artists, animal lovers, and anyone who wants to practice simple shapes. In this easy step-by-step tutorial, we’ll break the drawing down into basic circles, lines, and details—perfect for kids, classrooms, and homeschool activities.

Baby goats are playful, curious, and full of personality, which makes them wonderful drawing subjects. By following these clear instructions, you’ll learn how to create a cute and lively kid goat standing on a wooden beam. Let’s get started!


    🐐 Step-by-Step: How to Draw a Kid (Baby Goat)

    Step 1: Sketch the Basic Shapes
    Start with three simple ovals—one for the head and two for the body. Place the head oval slightly above the body and tilt it gently to give your goat a lively pose.

    Step 2: Connect the Shapes
    Add curved lines to connect the body parts. These lines will form the back and torso. Sketch a small circle for the snout and mark where the legs will go. Our kid is climbing, so the feet line goes up to the right. Add small ovals for the hooves.

    Step 3: Add the Ears and Face
    Draw two triangle-shaped ears pointing outward. Add a small dot for the eye and outline the muzzle. Begin shaping neck by drawing some from the head to the front body. Some circles inbetween torso and feet mark the knees.

    Step 4: Build the Legs
    Use simple straight and curved lines to form the legs. Baby goats have thin, delicate legs, so keep them narrow.

    Step 5: Add the Tail and Horn Bumps
    Sketch a tiny fluffy tail and add small bumps on top of the head where the horns will grow. Begin refining the leg shape and add gentle curves for connecting the joints.

    Step 6: Outline the Final Details
    Draw the final outline over your sketch. Add fur texture, hooves, and the wooden plank under the goat’s feet. Erase any construction lines.

    Step 7: Add Color
    Color your kid goat with soft brown, white, or gray tones. Baby goats often have adorable patches and markings—feel free to get creative!

    Learn how to draw a kid baby goat farm animals drawing instructi

    🎨 Creative Ideas for Using This Baby Goat Tutorial

    Here are some fun ways kids, teachers, and parents can use this drawing tutorial:

    Classroom Art Projects: Use this tutorial during a farm-animals art lesson or a springtime classroom activity.

    Farm-Themed Worksheets: Create printable coloring pages or step-by-step worksheets for early learners.

    Easter or Spring Crafts: Pair your finished drawing with handmade cards, paper cutouts, or farm-themed decorations.

    Homeschool Nature Lessons: Combine art + science by drawing the goat and learning about how goats live on a farm.

    Bullet Journal or Sketchbook Practice: Use the simple shapes method to practice proportion, curves, and line confidence.

    Kids’ Activity Packs: Add this baby goat tutorial to your your own printable activity bundles or drawing kits.

    Learn How to Draw a Wolf in 6 Easy Steps

    Learn How to Draw a Wolf in 6 Easy Steps

    A beginner-friendly tutorial to sketch a beautiful forest wolf

    Wolves are mysterious, powerful, and incredibly fun to draw. With their sharp eyes, fluffy tails, and elegant stance, they make the perfect subject for artists of all ages. In this step-by-step tutorial, you’ll learn how to draw a wolf using simple shapes and clear lines—even if you’re a complete beginner.

    Grab a pencil, find a comfy spot, and let’s start drawing your very own forest wolf!


      Step-by-Step: Learn to Draw a Wolf

      Step 1: Begin with two simple shapes—a circle for the wolf’s head and an oval for the body. Add a curved line for the neck.

      Step 2: Sketch the wolf’s snout and the angled lines that form the chest. These guiding shapes help define the wolf’s pose and proportions. Add 4 guiding ovals for the paws.

      Step 3: Add pointy ears, the eyes, and the nose. Draw a soft curve for the mouth and outline the beginning of the wolf’s thick neck fur. Also add more ovals on top of the paws for the joints.

      Step 4:  Sketch the long, curved tail. Begin shaping the legs with straight and curved lines.

      Step 5: Refine the wolf’s body by adding details like the thicker chest fur, leg joints, and paws. Add the main contours of the tail and define the face further.

      Step 6: Finish your wolf by adding fur texture, shadows, and color. Place it in a forest scene to make your drawing come alive. Well done—you’ve drawn a wolf!

      step-by-step wolf drawing tutorial – easy guide to draw a wolf

      Creative Ideas to Continue Drawing

      Ready to take your wolf drawing even further? Here are some fun and creative ideas:

      • Draw a wolf pack: Add more wolves in different poses—howling, running, or resting.

      • Change the setting: Place your wolf on a snowy hill, in a misty forest, or under a full moon.

      • Experiment with colors: Try drawing a white Arctic wolf, a grey timber wolf, or even a fantasy-colored wolf with blue or gold fur.

      • Add motion: Create action lines to make your wolf look like it’s jumping, prowling, or howling.

      • Turn it into a character: Give your wolf accessories—like a little scarf, magical markings, or expressive cartoon eyes.

      Drawing is all about imagination, so let your creativity roam as wild as the wolf itself!

      Learn How to Draw a Cute Gingerbread Man — Easy Step-by-Step Christmas Drawing

      Learn How to Draw a Cute Gingerbread Man — Easy Step-by-Step Christmas Drawing

      This cute gingerbread man drawing tutorial is perfect for holiday fun! Whether you’re preparing Christmas activities for kids, creating festive worksheets, or adding a cheerful illustration to your website, this step-by-step guide shows you exactly how to draw a gingerbread man using simple shapes.

      What You Need

      • Pencil and eraser

      • Fineliner or marker

      • Colored pencils or markers

      • Optional: white gel pen for icing details


          Gingerbread Man Step-by-Step Tutorial

          Step 1 — Basic Guidelines

          Draw a circle for the head. Add a vertical and horizontal guideline through the circle to help place the face. Then sketch a simple stick figure: one vertical line for the body and a horizontal line for the shoulders.

          Step 2 — Add Face & Legs

          Draw two small dots for the eyes and a curved line for a happy smile.
          Create the classic gingerbread man legs using two rounded, soft “V” shapes that connect at the top.

          Step 3 — Arms & Buttons

          Draw two thick, rounded arm shapes extending from each side of the body — think of soft cookie dough shapes.
          Add three buttons along the middle line. You can add a bow tie now or later.

          Step 4 — Outline & Icing Details

          Round out the head and smooth all edges to get that cookie-like shape.
          Add decorative icing patterns on the arms, legs and around the face — zigzags, waves, swirls or dots work great.
          Include a small bow tie and define the cookie edges to prepare for coloring.

          Step 5 — Color Your Gingerbread Man

          Outline everything neatly and erase any leftover guidelines.
          Color the body a warm gingerbread brown, add red cheeks, bright buttons, and green or red icing for a festive touch.
          Finish with small dots or speckles to make it look like baked cookie texture.

          Learn how to draw a gingerbread man for christmas

          Tips for a Cute Gingerbread Man

          • Keep all shapes soft and round — no sharp angles.

          • Use warm brown tones with lighter highlights to give a baked look.

          • Add a white outline to the top edges of the arms and legs for a shiny icing effect.

          • Use the guideline circle to keep the face symmetric and expressive.

            Creative Ideas for Gingerbread Man Drawings

            1. Holiday Cards: Draw different expressions (winking, singing, smiling) and turn them into card designs.
            2. Cookie Garland: Make several gingerbread men in different colors and connect them with string as decorations.
            3. Classroom Worksheet: Provide the simple guidelines so kids can draw their own cookies and add their own icing patterns.
            4. Gingerbread Family: Create a gingerbread woman, baby gingerbread, or even pets for a whole sweet family.
            5. Christmas Countdown: Draw 24 mini gingerbread men and use them as a DIY advent calendar.
            6. Dress-Up Variation: Add scarves, hats, candy canes, or tiny sweaters for extra personality.
            Learn How to Draw a Cute Reindeer — Easy Christmas Drawing for Kids & Beginners

            Learn How to Draw a Cute Reindeer — Easy Christmas Drawing for Kids & Beginners

            If you’re looking for a fun and beginner-friendly Christmas drawing project, this adorable reindeer tutorial is perfect. Using just a few simple shapes, you’ll learn how to draw a reindeer step by step — ideal for kids, classroom activities, festive crafts or holiday-themed blog content.

            What You Need

            • Pencil & eraser

            • Black fineliner or marker for outlining

            • Colored pencils or markers for shading and details


              Step-by-Step Guide

              Step 1 — Sketch the Basic Shapes

              Start with two ovals: a smaller one for the head and a larger one for the body. Position them slightly diagonally so the reindeer looks lively and dynamic.

              Step 2 — Add Ears, Snout & Tail Base

              Draw two pointed ears on top of the small oval. Add a rounded muzzle at the lower front of the head. On the big oval, sketch a small curve for the tail and position square shapes for the future hooves.

              Step 3 — Outline Head, Neck & Legs

              Connect the head to the body with two simple neck lines. Draw the front legs — one lifted for a playful pose — and add the hind legs. Sketch the eye as a curved “smile” shape and give your reindeer a friendly expression.

              Step 4 — Draw Antlers & Fur Details

              Add soft, rounded antlers with two branches on each side. Give shape to the muzzle, ear insides and cheek mark. Add the wavy tuft of chest fur and refine the legs with clearer lines and hooves.

              Step 5 — Outline & Color

              Trace your final lines with a marker or darker pencil. Erase any guidelines.
              Color the reindeer in warm browns, adding spots and shading for texture. Make the nose a soft pink or red (for a Rudolph version!) and add highlights to the eyes and antlers for extra charm.

              draw a snowman easy instructions

              Creative Ideas for Using Your Drawing

              1. Christmas Cards: Add a snowy background or fairy lights and turn your reindeer into a personalized greeting card.
              2. Gift Wrapping Tags: Print mini versions and attach them to wrapped presents.
              3. Classroom Worksheets: Provide the outlined steps as traceable shapes for younger kids.
              4. Holiday Decorations: Color several reindeer in different poses, cut them out and hang them as a garland.
              5. Rudolph Variation: Give your reindeer a bright red nose and snowflake patterns on the fur.
              6. Winter Scene: Draw pine trees, snow and a sleigh to create a festive landscape.
              Learn how to draw an angel for christmas (easy)

              Learn how to draw an angel for christmas (easy)


              How to Draw a Cute Angel — Step-by-Step (Easy Christmas Drawing for Kids & Beginners)

              Looking for a quick, beginner-friendly drawing tutorial you can use on cards, classroom activities or seasonal crafts? This simple step-by-step guide shows you how to draw a cute angel using basic shapes — perfect for kids, scrapbookers and anyone wanting a charming Christmas illustration. The tutorial is optimized for “learn to draw an angel,” “easy angel drawing,” and “Christmas drawing for kids,” so it’s great for teacher resources, printable activity sheets, or blog posts.

                What you need

                • Pencil and eraser

                • Black fineliner or marker (optional)

                • Colored pencils, crayons or markers for coloring


                Step-by-Step Guide

                Step 1 — Head & Guidelines
                Draw a circle for the head. Lightly add a vertical line down the middle and a horizontal line across the lower third of the circle — these are facial guidelines to place the eyes, nose and mouth.

                Step 2 — Neck, Body & Face Blocks
                Under the head draw a small rounded neck and a soft oval or pear shape for the upper body. Sketch simple shapes for the eyes (two small arcs) and a rounded triangle for the nose on the vertical guideline. Add a gentle curved baseline where the skirt will flow.

                Step 3 — Arms, Halo & Dress Outline
                Sketch the halo as a thin oval above the head. Draw the arms as simple curved lines resting on the belly (hands together). Outline the dress as a broad curved shape that flares out — keep it flowing and symmetrical for a sweet, floating look.

                Step 4 — Hair, Wings & Details
                Add wavy hair framing the face — simple S-shaped locks work well. Draw stylized wings on each side with rounded feather lobes (three or four lobes per wing). Refine the facial features (closed smiling eyes, small mouth) and add trim details along the bottom of the skirt (ruffle line).

                Step 5 — Ink & Color
                Trace your final lines with a fineliner or darker pencil and erase guidelines. Color the hair a warm blonde or brown, the dress creamy white or pastel, and add soft shadows under the wings and skirt. Highlight the halo with a golden tone and give cheeks a rosy blush for extra charm.

                  christmas angel drawing tutorial

                  Creative Ideas & Ways to Use the Drawing

                  1. Christmas Cards: Scan or photograph your colored angel and place it on a printable card with a “Season’s Greetings” caption.
                  2. Gift Tags & Labels: Reduce the drawing to a small size and add a name banner beneath the angel for handmade gift tags.
                  3. Classroom Template: Create a printable worksheet with the faint guideline circles so kids can trace and color.
                  4. Seasonal Garland: Draw several angels in different poses/colors, cut them out and string them for a festive garland.
                  5. Mixed Media: Add glitter to the halo, sew a tiny ribbon at the neckline, or glue cotton for a fluffy dress hem.
                  6. Coloring Variation: Try nocturnal palette (deep blues, silvers) for a midnight-choir theme or bright, candy-colored angels for a playful look.
                  7. Animated Sequence: Make three frames (open mouth, closed mouth, hands moving) and flip them into a simple paper animation for kids.
                  Learn to Draw a Christmas Tree – Easy Christmas Drawing

                  Learn to Draw a Christmas Tree – Easy Christmas Drawing

                  How to Draw a Christmas Tree: A Fun and Easy Guide for Kids and Teens

                  Drawing a Christmas tree is a wonderful way to get into the holiday spirit! Whether you want to decorate a card, create festive artwork for your room, or simply enjoy a creative activity, learning how to draw a Christmas tree is both simple and fun. Follow this kid-friendly guide to make your very own cheerful Christmas tree.

                  Step 1: Start with the Tree Shape

                  Begin by drawing a simple cone or triangle shape. This will be the base of your tree. Don’t worry about making it perfect—Christmas trees come in all shapes and sizes!

                  Step 2: Add the Branch Layers

                  Now, turn your triangle into a fluffy evergreen. Draw wavy, curved layers from the top to the bottom, making each layer a bit wider than the one above. This gives your tree a full, leafy look—just like real Christmas trees decorated for the holidays.

                  Step 3: Add a Star and Decorations

                  At the top of your tree, draw a bright star. This star is the classic finishing touch!
                  Then, add ornaments. You can draw circles for traditional baubles, cute stars, or any shapes you like—hearts, snowflakes, even tiny gifts. Spread them around the tree to make it look balanced and festive.

                  Step 4: Add More Details

                  Want your tree to look extra magical? Add small sparkles, more layers of branches, or extra ornaments. This is your chance to be creative! You can even draw a tiny trunk at the bottom to complete the shape.

                  Step 5: Outline Your Drawing

                  Once you’re happy with the design, trace your lines with a darker pencil or marker. This makes your drawing stand out and look clean.

                  Step 6: Color Your Christmas Tree

                  Now the best part—coloring! Use shades of green for the tree, yellow for the star, and bright reds, blues, or golds for the ornaments. Make it as colorful and joyful as you want.

                  Learn to draw a christmas tree holiday

                  Drawing a Christmas tree is a fantastic holiday activity for kids and teens. It’s easy, relaxing, and lets your imagination shine. So grab your pencils and create your very own festive masterpiece! 🎄✨

                  Learn to Draw… A Snowman!

                  Learn to Draw… A Snowman!

                  Easy Snowman Drawing Tutorial for Kids and Beginners

                  Drawing a snowman is one of the most fun and friendly ways to start learning simple shapes. In this tutorial, we’ll show you step-by-step how to draw your very own snowman. Grab a pencil, some paper, and maybe a few crayons—and let’s begin!

                  Step-by-Step Instructions to your snowman drawing

                  Step 1: Start With Three Snowballs

                  Begin by sketching three circles stacked on top of each other.

                  • The biggest circle goes at the bottom.

                  • A medium circle sits in the middle.

                  • A smaller circle forms the head on top.

                  These don’t have to be perfect—snowballs are wonderfully uneven!


                  Step 2: Add Eyes and Arms

                  Next, add two dots on the head for the snowman’s eyes.
                  On each side of the middle circle, draw an oval shape—these will become the arms.
                  Finally, sketch a long rectangle above the head to mark where the hat will go.


                    Step 3: Draw the Hat, Carrot Nose, and Buttons

                    Time to give the snowman some style!

                    • Add a tall top hat on the head.

                    • Draw a long triangle for the carrot nose.

                    • Add a candy cane in one hand.

                    • Place two or three buttons down the center of the middle snowball.

                    • Outline the scarf around the neck.


                    Step 4: Add Details to the Face and Scarf

                    Now it’s detail time:

                    • Add dotted circles for the snowman’s smiling mouth.

                    • Draw the scarf fringes.

                    • Add stripes on the candy cane.

                    The snowman is really coming to life!


                    Step 5: Final Lines and Shading

                    Go over your drawing with darker lines or a marker.
                    Clean up any extra sketch lines.
                    Add light shading to the snowman’s body to give it a soft, snowy texture.


                    Step 6: Color Your Snowman

                    Use bright colors like:

                    • Orange for the carrot nose

                    • Red and green for the scarf

                    • Brown for the hat

                    • Red and white for the candy cane

                    Add a snowy background, falling snowflakes, or other winter details to finish your artwork.


                    Optional: Add a Winter Background

                    Make your drawing extra magical by adding:

                    • Falling snowflakes

                    • Pine trees

                    • A snowy hill

                    • A bright sun or a glowing moon


                    draw a snowman easy instructions

                    You Did It!


                    You’ve just learned how to draw a cheerful snowman! Practice a few more times, and try drawing a whole snow family with different sizes, hats, and poses.

                    Stay tuned for more fun lessons in the “Learn to Draw…” series!

                    Learn how to draw a seahorse

                    Learn how to draw a seahorse

                    How to Draw a Seahorse – Easy Step-by-Step Guide

                    Have you ever wanted to draw one of the ocean’s most fascinating creatures? In this fun and easy tutorial, you’ll learn how to draw a seahorse step by step. With just a pencil, paper, and a bit of patience, you’ll soon have your own graceful seahorse ready to color. Let’s dive in!

                    Introduction: Meet the Seahorse

                    Seahorses are among the most unique creatures in the sea — with their curled tails, long snouts, and tiny fins. They might look delicate, but they are excellent swimmers and even stronger than they seem. Drawing a seahorse is a great way to explore ocean life while practicing smooth curves and fine details.

                    What you’ll need:
                    ✏️ Pencil and eraser
                    🖊️ Black pen or marker (for outlining)
                    🎨 Colored pencils or markers (yellow, orange, blue tones work beautifully)

                    Step-by-Step: How to Draw a Seahorse

                    Step 1: Draw the Body Outline

                    Start with a long curved line shaped a bit like an “S.” This will be the main structure of your seahorse’s body and tail.

                    Step 2: Add the Head and Snout

                    At the top of your curve, draw a rounded head and a long rectangular snout. Seahorses have a distinctive horse-like face — that’s where their name comes from!

                    Step 3: Create the Tail Spiral

                    Now add a spiral at the bottom to form the coiled tail. This helps your seahorse look realistic and balanced.

                    Step 4: Add Details to the Head and Fins

                    Draw a small round eye near the top of the head and a little fin on the back of the body. These fins help the seahorse swim gently through the water.

                    Step 5: Draw the Bumpy Outline

                    Seahorses have a textured body with tiny spikes and ridges. Lightly sketch those along the back and belly for a more natural look.

                    Step 6: Outline and Refine

                    Go over your pencil lines with a darker pen or fine marker. Erase any extra lines and tidy up your drawing before coloring.

                    Step 7: Add Color and Shading

                    Color your seahorse in warm yellows, oranges, or gold tones — or make it magical with blues and purples! Use darker shades along the edges to give it a 3D effect and a little sparkle of white for underwater highlights.

                    seahorse drawing tutorial

                    Creative Ideas for Your Seahorse Drawing

                    • Draw a coral reef background with seaweed, shells, and tiny bubbles.

                    • Create a seahorse family — small ones for babies and larger ones for adults.

                    • Try using watercolors or digital brushes for a soft, flowing underwater effect.

                    • Combine your seahorse with other sea creatures like starfish, turtles, or jellyfish.

                    Learn how to draw easy halloween pumpkins

                    Learn how to draw easy halloween pumpkins

                    How to Draw a Halloween Pumpkin – Step-by-Step Tutorial

                    Nothing says Halloween like a glowing jack-o’-lantern! In this easy drawing tutorial, you’ll learn how to draw a Halloween pumpkin step by step. Whether you’re a beginner or looking for a fun fall activity, this guide will help you create your own spooky pumpkin illustration — perfect for cards, decorations, or digital art projects.


                    Step 1: Draw the Pumpkin’s Basic Shape

                    Start with a tall oval in the center of your page. This will form the middle section of your pumpkin.

                    Step 2: Add the Side Sections

                    Draw two rounded shapes on each side of the oval. These overlapping curves make your pumpkin look nice and plump.

                    Step 3: Sketch the Stem

                    Add a curved, slightly uneven stem at the top. Don’t worry about making it perfect — real pumpkin stems are never completely straight!

                    Step 4: Complete the Pumpkin Segments

                    Draw a few smaller humps behind your main sections to give the pumpkin more depth and dimension.

                    Step 5: Create the Jack-o’-Lantern Face

                    Now comes the fun part — give your pumpkin a personality!
                    You can draw:

                    • Classic triangles for eyes and nose, and a wide jagged grin

                    • Or try zigzag lines for a spookier, monster-style expression

                    Step 6: Add Color and Shading

                    Color your pumpkin with warm oranges and browns. Shade the inner lines for a round look, and use darker tones around the eyes and mouth for that glowing, candlelit effect.

                    pumpkin drawing step by step

                    Creative Ideas

                    🎨 Try drawing different expressions — happy, scary, sleepy, or surprised pumpkins.
                    🕯️ Add a candle inside for a glowing effect.
                    🍂 Decorate the background with leaves, bats, or a full moon.
                    ✏️ Combine your pumpkins to make a fun Halloween scene!


                    How to Draw Tulips Step by Step – Easy Flower Drawing Tutorial for Beginners

                    How to Draw Tulips Step by Step – Easy Flower Drawing Tutorial for Beginners

                    Learn to Draw Tulips – Easy Step by Step Tutorial

                    Tulips are among the most beloved spring flowers. With their elegant shapes and vibrant colors, they brighten up gardens, bouquets, and even art! These flowers are a symbol of renewal and are perfect subjects for beginner artists to practice drawing. In this tutorial, you’ll learn how to draw tulips in a simple step-by-step process. By the end, you’ll have your very own tulip illustration that you can color in any shade you like—yellow, red, purple, or even multicolored!

                    Let’s get started.

                    Step-by-Step Tulip Drawing Tutorial

                    Step 1: Draw the Outer Leaves

                    Start by sketching two lines shaping a V letter. They will be parts of the tulip’s leaves.

                    Step 2: Add the Stem

                    Draw the stem somewhere in the middle of the V. You need two parallel lines going up. Tulips usually have quite straight stems.

                    Step 3: Add Leaves

                    Tulips have long, pointed leaves that grow upward from the base. Finalize these leaves so it looks threedimensionally.

                    Step 4: Outline the Buds

                    At the top of each stem, sketch a simple tulip bud shape. You can experiment with different tulip forms:

                    • A closed bud (oval with a pointed top).

                    • An open bud with two petals spread apart.

                    • A more wavy, elegant tulip bloom.

                    Step 5: Add Petal Details

                    Refine the flower heads by drawing the inner petals. Tulips usually have overlapping petals with soft points at the top. Add extra lines to show the layers of petals.

                    Step 6: Color Your Tulips

                    Once the outlines are done, bring your tulips to life with color! Use yellow, red, purple, or pink for the petals, and green for the leaves and stems. You can also add shading for a more realistic look.

                    tulip flower drawing tutorial

                    Final Touch

                    Now you’ve drawn your very own tulips! Whether you keep them simple or experiment with bold colors, tulips always look beautiful on paper. This is a perfect drawing to celebrate spring or to practice flower illustrations. You can also experiment with different bud shapes, since there is an endless variety of tulips out there!

                    Maybe you can use your new skills for the next selfmade birthday card or on mother’s day? 

                    If you enjoyed this tutorial, be sure to check out more step-by-step guides at learn-to-draw-online.com and keep building your drawing skills!

                    Learn How to Draw a Blue Whale: Step-by-Step for Beginners

                    Learn How to Draw a Blue Whale: Step-by-Step for Beginners

                    Dive into Drawing with This Easy Whale Tutorial!

                    Ever wanted to draw one of the ocean’s most majestic creatures? Blue whales are the largest animals on Earth—and now you can bring one to life on paper! Whether you’re a beginner or a budding young artist, this simple tutorial will guide you step-by-step through the process of drawing a beautiful blue whale. Grab your pencil and let’s make a splash!

                    ✏️ Step-by-Step Drawing Tutorial: How to Draw a Blue Whale

                    Follow these 6 easy steps to draw your own blue whale:

                    Step 1: Draw a Wavy Line for the Body

                    Start by sketching a long, slightly curved line. This will be the outline for the bottom of the whale’s body.

                    Step 2: Complete the Body Shape

                    Now draw a second curved line above the first, connecting both ends to create the full body shape. The head should be rounded, and the tail end should taper to a point.

                    Step 3: Sketch the Tail and Mouth

                    Add two angled lines to the back of the whale for the flukes (tail fins). Then draw a short line on the whale’s head to begin shaping the mouth. Draw a small eye near that line

                    Step 4: Add the Flippers and Eye

                    Add the side fin (flipper) halfway down the body. You can also add a small triangle on the tail fin to give it more shape.

                    Step 5: Draw the Throat Pleats

                    Use several curved lines under the mouth to show the whale’s throat pleats. These details make it look more realistic and dynamic!

                    Step 6: Final Touches and Color

                    Now, trace over your final lines with a darker pen or marker. Erase any sketch marks. Add color: deep blue for the back and lighter shades for the underside. You can even draw the ocean around it to complete the scene!


                    Learn how to draw a blue whale ocean drawing instruction

                    🎨 After the Drawing: Tips for Coloring and Going Further

                    Now that you’ve drawn your whale, it’s time to get creative! Use colored pencils, markers, or even digital tools to bring your blue whale to life. Try adding details like:

                    • Water splashes or waves for a dramatic ocean effect

                    • A school of fish or tiny bubbles to suggest movement

                    • A gradient sky above the water for extra depth

                    If you’re feeling adventurous, draw more sea creatures around your whale and create an entire underwater scene!


                    Ready to keep creating? Explore more sea animal tutorials and unleash your inner artist at learn-to-draw-online.com.

                    Let your creativity swim wild! 🐋

                    Learn to Draw a Lion – Step-by-Step Guide

                    Learn to Draw a Lion – Step-by-Step Guide

                    🦁 Learn to Draw a Lion

                    Ready to bring the king of the jungle to life on your sketchpad? Lions may look complex, but with just a few basic shapes and easy steps, you’ll be drawing your own majestic big cat in no time! This tutorial is perfect for beginners of all ages—just grab a pencil, and let’s get started.

                    Step-by-Step Instructions to your lion drawing

                    Step 1:
                    Start by drawing two simple ovals—one for the lion’s head and a larger one for the body.

                    Step 2:
                    Add two curved ears on the head and sketch the lion’s snout. These small details give the face its character.

                    Step 3:
                    Begin shaping the lion’s mane and neck by adding zigzag lines around the head and connecting it to the body. Also, add guiding circles for the legs and joints.

                    Step 4:
                    Use straight and curved lines to connect the leg joints. Outline the legs and sketch the paws using simple oval shapes.

                    Step 5:
                    Add facial features like the eyes, nose, and whiskers. Define the mane with more texture, and complete the tail with a tuft at the end.

                    Step 6:
                    Now color in your lion and add some ground details like grass to place it in its natural habitat. Congratulations—you’ve drawn a lion!


                    Learn how to draw a sea turtle ocean drawing instruction

                    Roar-some Job!


                    Great job! Drawing is not about perfection—it’s about having fun and expressing yourself. Feel free to give your lion a unique twist: maybe a funky mane, a playful pose, or even a crown! And don’t stop here—there are tons of other animals and characters waiting for you to discover on learn-to-draw-online.com. Keep sketching, keep smiling, and most of all—keep having fun!

                    Easy Turtle Drawing for Kids: Make Your Own Ocean Friend

                    Easy Turtle Drawing for Kids: Make Your Own Ocean Friend

                    Learn to Draw a Turtle

                    Well-armored and roaming the seas


                    For all ocean and water lovers, we have a very special animal in this drawing tutorial: the turtle. With its thick shell, it has survived through the millennia. Turtles existed even during the time of the dinosaurs! They may seem slow and sluggish when crawling on land, but don’t be fooled! In the oceans, they are in their element and can swim fast and dive for long periods. Want your own turtle? Then just draw one! Grab your pencils, and let’s get started!

                    From Shell to Swim: A Fun Guide to Drawing a Turtle


                    Drawing this armored animal isn’t too difficult—just follow the step-by-step instructions carefully. You’ll see that it consists mainly of simple basic shapes: circles, triangles, and lines. The only exceptions are the patterns in steps 5 and 6. The pattern on the shell is important to make your turtle recognizable and realistic. The spots on the head, fins, and legs are optional, but if you add them, they look beautiful and impactful. Your drawing will instantly look more detailed and intricate. If you’ve followed all the steps, you’ll surely have drawn a lovely turtle. Then, outline it with a black fineliner and erase all pencil lines.


                    Learn how to draw a sea turtle ocean drawing instruction

                    What’s Next?


                    Now that your turtle is drawn, why not take your creativity even further? The possibilities are endless! How about adding some color? Use different shades of yellow and brown to bring your turtle’s shell to life. Or, why not create an entire underwater scene with other sea creatures and vibrant plants? You can check out our tutorial for dolphins for inspiration. If you love patterns, why not try filling the shell with Zen Doodle designs? The turtle’s shell is the perfect place to get creative with intricate details. What will you add to your turtle masterpiece? The ocean is your canvas!

                    Bring the Farm to Life: Easy Rooster Drawing Tutorial

                    Bring the Farm to Life: Easy Rooster Drawing Tutorial

                    Learn to Draw a Colorful Rooster: A Fun and Engaging Activity for Kids

                    Drawing animals is an exciting way for children to explore their creativity while learning new skills. One of the most colorful and fun animals to draw is the rooster! 

                    Roosters are known for their vibrant feathers, giving kids the opportunity to experiment with bold and bright color combinations. The drawing process involves simple shapes like triangles, curves, and circles, making it beginner-friendly. This activity also boosts creativity as kids can personalize their rooster with unique patterns and color choices. Additionally, drawing a rooster encourages curiosity about farm animals and helps children learn about the role roosters play on the farm, making it both educational and fun.


                    Step-by-Step Tutorial: Drawing a Colorful Rooster

                    1. Start with the Body: Draw a tilted drop shape for the body. Leave some space on the bottom and right side for the legs and tail of the rooster.

                    2. Add the Beak, Tail Line and Feet: Draw a small bended triangle pointing outward from the tip of the drop. Add a curvy line for the tail and two ellipses for the feet. 

                    3. Wings, toes and comb: Draw some wings, add front and back toes with spiky claws and and add a comb shape (like a wavy crown) on top of the head.

                    4. Legs and some Details: Add some legs (slightly curved), some wing feathers, a simple dot for the eye and a jaw line.

                    5. More Details: Draw some more feathers at the body, wing and tail and two more toes on each foot.

                    6. Finishing: Trace the drawing with a black fineliner and erase all pencil lines.


                    Learn how to draw a rooster farm animals drawing instruction

                    From Sketch to Splash of Color!

                    You’ve drawn the outline—now it’s time to make your rooster shine! Roosters are famous for their bold and colorful plumage, so don’t hold back when choosing your shades. Start with a bright red for the comb and wattle, adding depth by layering darker hues. For the feathers, consider using a mix of warm tones like orange, yellow, and gold, blending them to create a natural gradient.

                    Add contrast by using greens or blues for the tail and tummy feathers, giving your rooster an eye-catching look. You can also experiment with patterns, like adding speckles or stripes to some of the feathers for extra personality. Once the coloring is complete, outline the rooster with a fine black marker to make it pop. Your colorful, proud rooster is ready to take center stage!

                    Learn to draw a cute beach crab – easy drawing for beginners

                    Learn to draw a cute beach crab – easy drawing for beginners

                    Learn to Draw a Cute Beach Crab: A Fun and Easy Activity for Kids

                    Drawing is more than just a creative outlet—it’s an excellent way for children to develop fine motor skills, boost their imagination, and build confidence. One of the most delightful and simple drawing activities for kids is creating a cute beach crab! In this tutorial, we’ll guide you through an easy, step-by-step process to help your little ones bring this adorable sea creature to life.


                    Step-by-Step Tutorial: Drawing a Cute Beach Crab

                    Step 1: We start very simply with an oval.

                    Step 2: Add a hook on the bottom right and left. Then, draw two ovals for the eyes.

                    Step 3: Add two more hooks and two U-shaped lines. Now, erase the lines inside the eyes.

                    Step 4: With two Vs, turn the Us into proper crab claws. Add a few more details, and your crab already looks really cute.

                    Step 5: Now you can neatly trace the animal with a black pen and erase the pencil lines.

                    Step 6: A little bit of color, and your crab is done! Use a bright red for the body, brown for the legs, and leave the eyes white.


                    Learn how to draw easy beach crab drawing instruction

                    Your Crab is Complete! Keep Drawing and Having Fun

                    Now you’ve created your very own artwork! How about drawing an entire underwater world from your imagination? Or a beach scene with shells and crabs?

                    Drawing a beach crab is not only a fun way for kids to express themselves but also a valuable activity that nurtures creativity and learning. Plus, these little crabs make for adorable additions to any summer-themed art project! Encourage your child to try different colors and experiment with their crab’s expressions—they’ll love seeing their imagination come to life!

                    Learn how to draw a crocodile

                    Learn how to draw a crocodile

                    Meet the Crocodile: A Guide to Drawing This Mighty Reptile

                    Welcome to this fun and easy guide on how to draw a crocodile! Crocodiles are fascinating creatures, known for their ancient lineage, powerful jaws, and tough, scaly skin. As one of the oldest living reptiles, they’ve been around for over 200 million years, making them a symbol of resilience and adaptability in the wild. Whether you’re a beginner or an experienced artist, this step-by-step tutorial will guide you through drawing a realistic crocodile, highlighting its most distinctive features, like its rugged body, sharp teeth, and piercing eyes. So grab your pencil and paper, and let’s bring this incredible reptile to life on the page!

                    Step by Step to Drawing a Crocodile

                    1. Start by drawing an oval that’s slightly tilted and narrower on the left side than on the right.
                    2. Next, add a circle for the head and two zigzag lines. These will become the crocodile’s legs.
                    3. Then, at the ends of the lines, add circles for the animal’s feet. Draw a nicely curved tail and a long, V-shaped snout.
                    4. The zigzag lines will now help you shape the crocodile’s legs—just draw around them. Now, add some details, like the eye. Don’t forget the small bump on the snout!
                    5. In this step, you can draw lots of zigzag lines. This will create a mouth full of sharp teeth, the sharp claws on the feet, and a jagged tail.
                    6. Finally, outline your masterpiece neatly and color it in. Green and yellow shades work great, but of course, feel free to let your imagination run wild!
                    Learn how to draw a crocodile dangerous animal drawing instruction

                    Crocodile or aligator? One family, different details

                    It’s easy to turn a crocodile into an alligator. Crocodiles and alligators look very similar, but they have different snouts. A crocodile has a V-shaped snout, while an alligator’s mouth is more U-shaped. Can you modify your drawing to reflect this? It might help to look at pictures of alligators for reference.

                    How to draw a robin – quick and easy bird drawing

                    How to draw a robin – quick and easy bird drawing

                    Learn to Draw a Robin – A Fun Art Activity for Kids

                    Drawing is a wonderful way for children to express their creativity, and robins are a fantastic subject to sketch! With their bright red chests, small beaks, and delicate wings, robins are both beautiful and fun to draw. They are also a familiar sight in gardens and parks, making them a great way to connect with nature through art.

                    Learning how to draw a robin helps children develop their fine motor skills, enhance their observation abilities, and build confidence in their artistic skills. Plus, drawing birds teaches kids about different shapes, textures, and colors, which strengthens their overall drawing abilities. Whether it’s for a school project, a greeting card, or just for fun, a robin is a perfect subject to bring to life on paper. So grab your pencils and paper, and let’s create an adorable robin step by step!

                    Step-by-Step Drawing a Robin Bird

                    Step 1: Draw the Body Shape Start by drawing a simple circle in the center of your page. This will be the robin’s body. Don’t worry about making it perfect—just a rounded shape will do!

                    Step 2: Add the Head and Ancles On top of the oval, draw a smaller circle for the head. Then, draw two tiny cirlces on the bottom to create the robin’s ancles. 

                    Step 3: Sketch the Wings, Legs and Eye Draw a V-shaped line from the middle of the body to form one of the wings.Then, at the bottom of the oval, draw a few straight lines for the legs and add a big eye.

                    Step 4: Add a Beak, Feet and Tail Draw a little beak on the left side of the head. Add 3 strokes to each ancle to make them look like tiny bird feet. Then, add a long tail.

                    Step 5: Add some Details

                    Add some lines on the beak, feet and wing to make your drawing more lively and detailed.

                    Step 6: Final Details and Coloring Now, go over your drawing with a fine marker to outline it neatly. Let it dry and erase all pencil lines. Then, grab your colors! Use red or orange for the chest, brown for the wings and back, and black for the eyes and beak. You can also add a little shading to make your robin look more realistic.

                    Learn how to draw a robin bird forest animals drawing instructio

                    Your Robin is Complete! Keep Drawing and Having Fun

                    Drawing a robin is an exciting and easy activity for kids of all ages. With just a few simple shapes and some creativity, children can create a beautiful bird while improving their artistic skills. Not only is it a great way to practice drawing, but it also provides an opportunity to learn about this charming bird and its habitat.

                    By drawing robins, kids can develop a deeper appreciation for nature and wildlife while having fun with colors and patterns. Whether you create a realistic robin or add your own imaginative twist, each drawing will be unique and special. Keep practicing, have fun, and don’t be afraid to experiment with colors and details. Now, it’s time to grab your pencils and start drawing your own cheerful little robin!


                    Draw a realistic hedgehog

                    Draw a realistic hedgehog

                    How to Draw a Hedgehog for Kids – Easy and Fun Guide!

                    Drawing is a fantastic way for children to express their creativity, and what better subject to draw than a cute and spiky hedgehog? Hedgehogs are small, adorable creatures with tiny faces and lots of quills, making them a fun challenge to sketch. Learning how to draw a hedgehog helps improve fine motor skills, boosts confidence, and encourages imaginative thinking. So grab your pencils and paper, and let’s get started with this simple step-by-step guide!

                    Step-by-Step Drawing a Hedgehog

                    Take a look at the guide “How to Draw a Hedgehog” and try to follow it step by step using a pencil. Keep in mind during Step 1 that you need to leave some space on the left for the head. Then, simply follow the instructions until your hedgehog is fully drawn.

                    In Step 6, it’s best to use a fine liner to carefully go over your drawing. Pay close attention to the sketch, as you don’t need to trace every line from Step 5.

                    Once you’re happy with your drawing, grab some colored pencils or markers in different shades of brown. The hedgehog’s spines are dark brown with light gray tips. When coloring, leave a few light strokes to make the hedgehog look especially realistic.

                    Learn how to draw a ladybug forest animals drawing instruction

                    Start Drawing your own Hedgehog now!

                    Drawing a hedgehog is an easy and enjoyable activity for kids. By following these simple steps, children can create their very own adorable hedgehog drawing while developing their artistic skills. Remember, practice makes perfect, so keep drawing and have fun!

                    Now it’s your turn! Grab your pencils and start drawing your cute little hedgehog today!


                    Learn to draw a lucky clover – quick and easy

                    Learn to draw a lucky clover – quick and easy

                    lucky clover drawing

                    How to Draw a Lucky Clover!

                    Do you want to draw a lucky four-leaf clover? A four-leaf clover is a special plant that brings good luck! Most clovers have three leaves, but sometimes, you can find a rare one with four! Follow these easy steps to draw your own lucky clover.

                    What You Need:

                    • A piece of paper
                    • A pencil
                    • A black fineliner
                    • Green colored pencils
                    • An eraser 

                    Step 1: Draw the Center
                    Start by drawing a cross. This will be the center of your clover. Make it nice and straight.

                    Step 2: Add Diagonal Lines
                    Now, draw two diagonal lines through the center of the cross. These lines should be much longer than the cross lines.

                    Step 3: Draw the Leaves
                    Add nice rounded curves to complete the shape of the leaves. Add an elipse for the cute little ladybug.

                    Step 4: Add a Stem and add Detail to the Ladybug

                    The stem should be a little bit curved. Add sensors a back head and dots to the ladybug.

                    Step 5: Outline, Erase and Color
                    Go over your drawing with a darker pencil or marker. If you have extra lines, use your eraser to clean them up. Now, grab your green crayon or marker and color in your clover! You can even add shading to make it look more real.

                    Bonus Tip:
                    If you want to make your clover even fancier, you can add little sparkles around it to show how lucky it is!


                    Learn how to draw a hummingbird drawing instruction

                    Have fun!

                    And there you have it! You just drew your very own lucky four-leaf clover. Keep practicing, and maybe you’ll find a real one someday!

                    Learn how to draw a stunning giraffe

                    Learn how to draw a stunning giraffe

                    What Fascinates Us About Giraffes

                    Giraffes are fascinating animals with long necks and spotted coats. Because we find them so interesting, today we want to learn how to draw them!

                    The neck of the giraffe is the longest of any animal, allowing it to reach high branches of trees to eat tasty leaves. The characteristic spot pattern on their coat is not only for looks but also helps them hide in tall grass and stay protected from predators like lions.

                    In addition to their long necks, giraffes also have long legs that help them run quickly and move away from danger. These impressive animals often live in groups, called herds, which can include various members, such as mothers with their young.

                    Interestingly, giraffes don’t sleep much and get by with only a few hours of sleep per day. When they do sleep, they often do so standing up, so they can quickly wake up and flee if danger approaches. The birth of giraffe calves, also called “calves,” occurs while standing, and the calves fall from an astonishing height to the ground. This helps them quickly get on their legs and join the herd.

                    As for their diet, giraffes mainly eat leaves, buds, and fruits. Their long necks allow them to reach branches that would be out of reach for other animals.

                    Native to the vast savannas of Africa, giraffes are not only fascinating due to their unique appearance but also because of their interesting behavior, making them creatures from whom there is much to learn.

                    Let’s get started!

                    How to Draw a Giraffe

                    Since giraffes have such a unique shape, it’s easy to recognize the drawing as a giraffe. However, if the animal is supposed to look somewhat realistic, it gets a bit trickier!

                    First, take a good look at the drawing tutorial to understand each step.

                    • Step 1: We started with the thighs and the nose. The thighs are two long teardrop shapes that taper at the bottom. The nose looks like a lying “C” with two lines in the middle. Pay attention to the spacing!
                    • Step 2: Connect the nose to the right teardrop – this should create a slightly slanted line, but another angle works too. Also, add four joints and a belly to the giraffe. The eyes are also started in this step.
                    • Step 3: Above the eyes, draw the giraffe’s horns. Then, connect the head to the back leg with a curved line. This line can even extend further to draw the tail. In this step, the legs and hooves are also drawn.
                    • Step 4: Almost done! Draw the giraffe’s oval-shaped ears and a few hairs on the back of the neck. Also, complete the tail by adding long hairs at the end.
                    • Step 5: Time for the final outline. Trace the important lines with a fine-liner. Be sure to look at the picture closely, as not all lines should be included in the final drawing.
                    • Step 6: Color in your giraffe! The characteristic pattern is brown, slightly angular spots on light fur. But perhaps you have your own ideas for your giraffe?
                    drawing instruction giraffe